Table of Contents
Information presented here is considered to be either basic or well-known material that is informative yet helpful. Over the years, I have observed an interesting behavior. There is an expectation that the process for joining a Windows client to a Samba-controlled Windows domain may somehow involve steps different from doing so with Windows NT4 or a Windows ADS domain. Be assured that the steps are identical, as shown in the example given below.
Microsoft Windows NT/200x/XP Professional platforms can participate in Domain Security. This section steps through the process for making a Windows 200x/XP Professional machine a member of a Domain Security environment. It should be noted that this process is identical when joining a domain that is controlled by Windows NT4/200x as well as a Samba PDC.
Procedure 15.1. Steps to Join a Domain
Click .
Right-click , and then select .
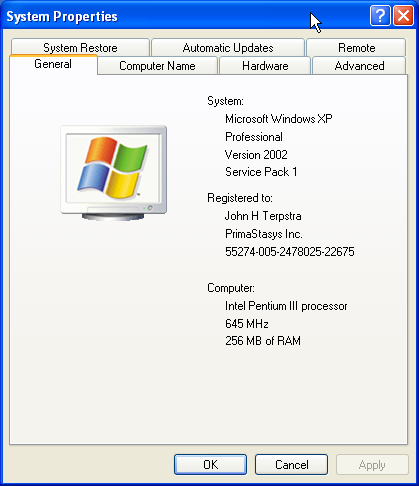
The opening panel is the same one that can be reached by clicking on the Control Panel. See “The General Panel.”.
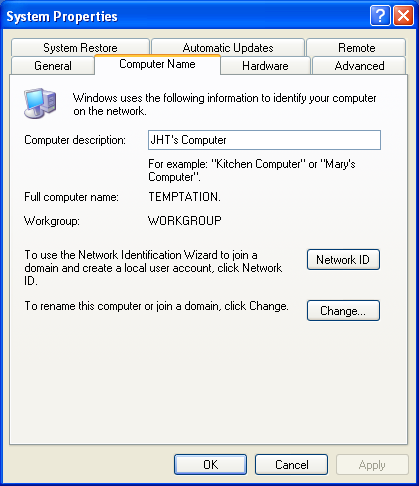
Click the tab. This panel shows the , the , and the or .
Clicking the button launches the configuration wizard. Do not use this with Samba-3. If you wish to change the computer name, or join or leave the domain, click the button. See “The Computer Name Panel.”.
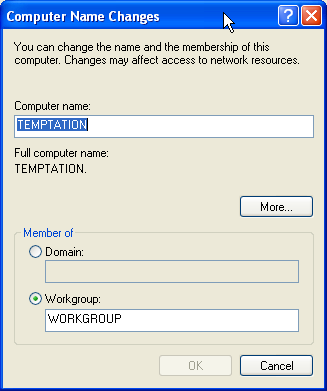
Click on . This panel shows that our example machine (TEMPTATION) is in a workgroup called WORKGROUP. We join the domain called MIDEARTH. See “The Computer Name Changes Panel”.
Enter the name in the field below the Domain radio button.
This panel shows that our example machine (TEMPTATION) is set to join the domain called MIDEARTH. See “The Computer Name Changes Panel Domain MIDEARTH”.
Now click the button. A dialog box should appear to allow you to provide the credentials (username and password) of a domain administrative account that has the rights to add machines to the domain.
Enter the name “root” and the root password from your Samba-3 server. See “Computer Name Changes User name and Password Panel”.
Click .
The “Welcome to the MIDEARTH domain” dialog box should appear. At this point, the machine must be rebooted. Joining the domain is now complete.
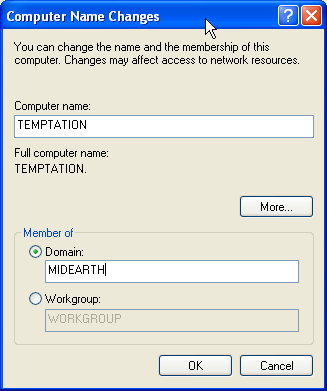

The screen capture shown in “The Computer Name Changes Panel Domain MIDEARTH” has a button labeled . This button opens a panel in which you can set (or change) the Primary DNS suffix of the computer. This is a parameter that mainly affects members of Microsoft Active Directory. Active Directory is heavily oriented around the DNS namespace.
Where NetBIOS technology uses WINS as well as UDP broadcast as key mechanisms for name resolution, Active Directory servers register their services with the Microsoft Dynamic DNS server. Windows clients must be able to query the correct DNS server to find the services (like which machines are domain controllers or which machines have the Netlogon service running).
The default setting of the Primary DNS suffix is the Active Directory domain name. When you change the Primary DNS suffix, this does not affect domain membership, but it can break network browsing and the ability to resolve your computer name to a valid IP address.
The Primary DNS suffix parameter principally affects MS Windows clients that are members of an Active Directory domain. Where the client is a member of a Samba domain, it is preferable to leave this field blank.
According to Microsoft documentation, “If this computer belongs to a group with Group Policy
enabled on Primary DNS suffice of this computer, the string specified in the Group Policy is used
as the primary DNS suffix and you might need to restart your computer to view the correct setting. The local setting is
used only if Group Policy is disabled or unspecified.”
One of the frustrations expressed by subscribers to the Samba mailing lists revolves around the choice of where the default Samba Team
build and installation process locates its Samba files. The location, chosen in the early 1990s, for the default installation is
in the /usr/local/samba directory. This is a perfectly reasonable location, particularly given all the other
Open Source software that installs into the /usr/local subdirectories.
Several UNIX vendors, and Linux vendors in particular, elected to locate the Samba files in a location other than the Samba Team default.
Linux vendors, working in conjunction with the Free Standards Group (FSG), Linux Standards Base (LSB), and File Hierarchy
System (FHS), have elected to locate the configuration files under the /etc/samba directory, common binary
files (those used by users) in the /usr/bin directory, and the administrative files (daemons) in the
/usr/sbin directory. Support files for the Samba Web Admin Tool (SWAT) are located under the
/usr/share directory, either in /usr/share/samba/swat or in
/usr/share/swat. There are additional support files for smbd in the
/usr/lib/samba directory tree. The files located there include the dynamically loadable modules for the
passdb backend as well as for the VFS modules.
Samba creates runtime control files and generates log files. The runtime control files (tdb and dat files) are stored in
the /var/lib/samba directory. Log files are created in /var/log/samba.
When Samba is built and installed using the default Samba Team process, all files are located under the
/usr/local/samba directory tree. This makes it simple to find the files that Samba owns.
One way to find the Samba files that are installed on your UNIX/Linux system is to search for the location
of all files called smbd. Here is an example:
root# find / -name smbd -print
You can find the location of the configuration files by running:
root#  /path-to-binary-file/smbd -b | more
...
Paths:
   SBINDIR: /usr/sbin
   BINDIR: /usr/bin
   SWATDIR: /usr/share/samba/swat
   CONFIGFILE: /etc/samba/smb.conf
   LOGFILEBASE: /var/log/samba
   LMHOSTSFILE: /etc/samba/lmhosts
   LIBDIR: /usr/lib/samba
   SHLIBEXT: so
   LOCKDIR: /var/lib/samba
   PIDDIR: /var/run/samba
   SMB_PASSWD_FILE: /etc/samba/smbpasswd
   PRIVATE_DIR: /etc/samba
...
If you wish to locate the Samba version, just run:
root#  /path-to-binary-file/smbd -V
Version 3.0.20-SUSE
Many people have been caught by installation of Samba using the default Samba Team process when it was already installed by the platform vendor's method. If your platform uses RPM format packages, you can check to see if Samba is installed by executing:
root#  rpm -qa | grep samba
samba3-pdb-3.0.20-1
samba3-vscan-0.3.6-0
samba3-winbind-3.0.20-1
samba3-3.0.20-1
samba3-python-3.0.20-1
samba3-utils-3.0.20-1
samba3-doc-3.0.20-1
samba3-client-3.0.20-1
samba3-cifsmount-3.0.20-1
The package names, of course, vary according to how the vendor, or the binary package builder, prepared them.
Samba essentially consists of two or three daemons. A daemon is a UNIX application that runs in the background and provides services.
An example of a service is the Apache Web server for which the daemon is called httpd. In the case of Samba, there
are three daemons, two of which are needed as a minimum.
The Samba server is made up of the following daemons:
Example 15.1. A Useful Samba Control Script for SUSE Linux
#!/bin/bash
#
# Script to start/stop samba
# Locate this in /sbin as a file called 'samba'

RCD=/etc/rc.d

if [ z$1 == 'z' ]; then
        echo $0 - No arguments given; must be start or stop.
        exit
fi

if [ $1 == 'start' ]; then
        ${RCD}/nmb start
        ${RCD}/smb start
        ${RCD}/winbind start

fi
if [ $1 == 'stop' ]; then
        ${RCD}/smb stop
        ${RCD}/winbind stop
        ${RCD}/nmb stop
fi
if [ $1 == 'restart' ]; then
        ${RCD}/smb stop
        ${RCD}/winbind stop
        ${RCD}/nmb stop
        sleep 5
        ${RCD}/nmb start
        ${RCD}/smb start
        ${RCD}/winbind start
fi
exit 0
- nmbd
This daemon handles all name registration and resolution requests. It is the primary vehicle involved in network browsing. It handles all UDP-based protocols. The
nmbddaemon should be the first command started as part of the Samba startup process.- smbd
This daemon handles all TCP/IP-based connection services for file- and print-based operations. It also manages local authentication. It should be started immediately following the startup of
nmbd.- winbindd
This daemon should be started when Samba is a member of a Windows NT4 or ADS domain. It is also needed when Samba has trust relationships with another domain. The
winbindddaemon will check thesmb.conffile for the presence of theidmap uidandidmap gidparameters. If they are not found,winbinddbails out and refuses to start.
When Samba has been packaged by an operating system vendor, the startup process is typically a custom feature of its integration into the platform as a whole. Please refer to your operating system platform administration manuals for specific information pertaining to correct management of Samba startup.
Example 15.2. A Sample Samba Control Script for Red Hat Linux
#!/bin/sh
#
# chkconfig: 345 81 35
# description: Starts and stops the Samba smbd and nmbd daemons \
#              used to provide SMB network services.

# Source function library.
. /etc/rc.d/init.d/functions
# Source networking configuration.
. /etc/sysconfig/network
# Check that networking is up.
[ ${NETWORKING} = "no" ] && exit 0
CONFIG=/etc/samba/smb.conf
# Check that smb.conf exists.
[ -f $CONFIG ] || exit 0

# See how we were called.
case "$1" in
  start)
        echo -n "Starting SMB services: "
        daemon smbd -D; daemon nmbd -D; echo;
        touch /var/lock/subsys/smb
        ;;
  stop)
        echo -n "Shutting down SMB services: "
        smbdpids=`ps guax | grep smbd | grep -v grep | awk '{print $2}'`
        for pid in $smbdpids; do
                kill -TERM $pid
        done
        killproc nmbd -TERM; rm -f /var/lock/subsys/smb
        echo ""
        ;;
  status)
        status smbd; status nmbd;
        ;;
  restart)
        echo -n "Restarting SMB services: "
        $0 stop; $0 start;
        echo "done."
        ;;
  *)
        echo "Usage: smb {start|stop|restart|status}"
        exit 1
esac
SUSE Linux implements individual control over each Samba daemon. A Samba control script that can be conveniently
executed from the command line is shown in “A Useful Samba Control Script for SUSE Linux”. This can be located in the directory
/sbin in a file called samba. This type of control script should be
owned by user root and group root, and set so that only root can execute it.
A sample startup script for a Red Hat Linux system is shown in “A Sample Samba Control Script for Red Hat Linux”.
This file could be located in the directory /etc/rc.d and can be called
samba. A similar startup script is required to control winbind.
If you want to find more information regarding startup scripts please refer to the packaging section of
the Samba source code distribution tarball. The packaging files for each platform include a
startup control file.
The following files are common to all DNS server configurations. Rather than repeat them multiple times, they are presented here for general reference.
The forward zone file for the loopback address never changes. An example file is shown
in “DNS Localhost Forward Zone File: /var/lib/named/localhost.zone”. All traffic destined for an IP address that is hosted on a
physical interface on the machine itself is routed to the loopback adaptor. This is
a fundamental design feature of the TCP/IP protocol implementation. The loopback adaptor
is called localhost.
Example 15.3. DNS Localhost Forward Zone File: /var/lib/named/localhost.zone
$TTL 1W
@		IN SOA	@   root (
				42		; serial
				2D		; refresh
				4H		; retry
				6W		; expiry
				1W )		; minimum

		IN NS		@
		IN A		127.0.0.1
The reverse zone file for the loopback address as shown in “DNS Localhost Reverse Zone File: /var/lib/named/127.0.0.zone”
is necessary so that references to the address 127.0.0.1 can be
resolved to the correct name of the interface.
Example 15.4. DNS Localhost Reverse Zone File: /var/lib/named/127.0.0.zone
$TTL 1W
@		IN SOA		localhost.   root.localhost. (
				42		; serial
				2D		; refresh
				4H		; retry
				6W		; expiry
				1W )		; minimum

		IN NS		localhost.
1		IN PTR		localhost.
Example 15.5. DNS Root Name Server Hint File: /var/lib/named/root.hint
; This file is made available by InterNIC under anonymous FTP as
;       file                /domain/named.root
;       on server           FTP.INTERNIC.NET
; last update: Nov 5, 2002. Related version of root zone: 2002110501
; formerly NS.INTERNIC.NET
.                        3600000  IN  NS    A.ROOT-SERVERS.NET.
A.ROOT-SERVERS.NET.      3600000      A     198.41.0.4
; formerly NS1.ISI.EDU
.                        3600000      NS    B.ROOT-SERVERS.NET.
B.ROOT-SERVERS.NET.      3600000      A     128.9.0.107
; formerly C.PSI.NET
.                        3600000      NS    C.ROOT-SERVERS.NET.
C.ROOT-SERVERS.NET.      3600000      A     192.33.4.12
; formerly TERP.UMD.EDU
.                        3600000      NS    D.ROOT-SERVERS.NET.
D.ROOT-SERVERS.NET.      3600000      A     128.8.10.90
; formerly NS.NASA.GOV
.                        3600000      NS    E.ROOT-SERVERS.NET.
E.ROOT-SERVERS.NET.      3600000      A     192.203.230.10
; formerly NS.ISC.ORG
.                        3600000      NS    F.ROOT-SERVERS.NET.
F.ROOT-SERVERS.NET.      3600000      A     192.5.5.241
; formerly NS.NIC.DDN.MIL
.                        3600000      NS    G.ROOT-SERVERS.NET.
G.ROOT-SERVERS.NET.      3600000      A     192.112.36.4
; formerly AOS.ARL.ARMY.MIL
.                        3600000      NS    H.ROOT-SERVERS.NET.
H.ROOT-SERVERS.NET.      3600000      A     128.63.2.53
; formerly NIC.NORDU.NET
.                        3600000      NS    I.ROOT-SERVERS.NET.
I.ROOT-SERVERS.NET.      3600000      A     192.36.148.17
; operated by VeriSign, Inc.
.                        3600000      NS    J.ROOT-SERVERS.NET.
J.ROOT-SERVERS.NET.      3600000      A     192.58.128.30
; housed in LINX, operated by RIPE NCC
.                        3600000      NS    K.ROOT-SERVERS.NET.
K.ROOT-SERVERS.NET.      3600000      A     193.0.14.129
; operated by IANA
.                        3600000      NS    L.ROOT-SERVERS.NET.
L.ROOT-SERVERS.NET.      3600000      A     198.32.64.12
; housed in Japan, operated by WIDE
.                        3600000      NS    M.ROOT-SERVERS.NET.
M.ROOT-SERVERS.NET.      3600000      A     202.12.27.33
; End of File
The content of the root hints file as shown in “DNS Root Name Server Hint File: /var/lib/named/root.hint” changes slowly over time. Periodically this file should be updated from the source shown. Because of its size, this file is located at the end of this chapter.
The following procedure may be used as an alternative means of configuring the initial LDAP database. Many administrators prefer to have greater control over how system files get configured.
The first step to get the LDAP server ready for action is to create the LDIF file from which the LDAP database will be preloaded. This is necessary to create the containers into which the user, group, and other accounts are written. It is also necessary to preload the well-known Windows NT Domain Groups, as they must have the correct SID so that they can be recognized as special NT Groups by the MS Windows clients.
Procedure 15.2. LDAP Directory Pre-Load Steps
Create a directory in which to store the files you use to generate the LDAP LDIF file for your system. Execute the following:
root#mkdir /etc/openldap/SambaInitroot#chown root:root /etc/openldap/SambaInitroot#chmod 700 /etc/openldap/SambaInitInstall the files shown in “LDAP Pre-configuration Script: SMBLDAP-ldif-preconfig.sh Part A”, “LDAP Pre-configuration Script: SMBLDAP-ldif-preconfig.sh Part B”, and “LDAP Pre-configuration Script: SMBLDAP-ldif-preconfig.sh Part C” into the directory
/etc/openldap/SambaInit/SMBLDAP-ldif-preconfig.sh.These three files are, respectively, parts A, B, and C of theSMBLDAP-ldif-preconfig.shfile.Install the files shown in “LDIF Pattern File Used to Pre-configure LDAP Part A” and “LDIF Pattern File Used to Pre-configure LDAP Part B” into the directory
/etc/openldap/SambaInit/.These two files are parts A and B, respectively, of theinit-ldif.patfile.Change to the
/etc/openldap/SambaInitdirectory. Execute the following:root#sh SMBLDAP-ldif-preconfig.sh How do you wish to refer to your organization? Suggestions: Black Tire Company, Inc. Cat With Hat Ltd. How would you like your organization name to appear? Your organization name is: My Organization Enter a new name is this is not what you want, press Enter to Continue. Name [My Organization]: Abmas Inc. Samba Config File Location [/etc/samba/smb.conf]: Enter a new full path or press Enter to continue. Samba Config File Location [/etc/samba/smb.conf]: Domain Name: MEGANET2 Domain SID: S-1-5-21-3504140859-1010554828-2431957765 The name of your Internet domain is now needed in a special format as follows, if your domain name is mydomain.org, what we need is the information in the form of: Domain ID: mydomain Top level: org If your fully qualified hostname is: snoopy.bazaar.garagesale.net where "snoopy" is the name of the machine, Then the information needed is: Domain ID: garagesale Top Level: net Found the following domain name: abmas.biz I think the bit we are looking for might be: abmas Enter the domain name or press Enter to continue: The top level organization name I will use is: biz Enter the top level org name or press Enter to continue:root#This creates a file called
MEGANET2.ldif.It is now time to preload the LDAP database with the following command:
root#slapadd -v -l MEGANET2.ldif added: "dc=abmas,dc=biz" (00000001) added: "cn=Manager,dc=abmas,dc=biz" (00000002) added: "ou=People,dc=abmas,dc=biz" (00000003) added: "ou=Computers,dc=abmas,dc=biz" (00000004) added: "ou=Groups,dc=abmas,dc=biz" (00000005) added: "ou=Domains,dc=abmas,dc=biz" (00000006) added: "sambaDomainName=MEGANET2,ou=Domains,dc=abmas,dc=biz" (00000007) added: "cn=domadmins,ou=Groups,dc=abmas,dc=biz" (00000008) added: "cn=domguests,ou=Groups,dc=abmas,dc=biz" (00000009) added: "cn=domusers,ou=Groups,dc=abmas,dc=biz" (0000000a)You should verify that the account information was correctly loaded by executing:
root#slapcat dn: dc=abmas,dc=biz objectClass: dcObject objectClass: organization dc: abmas o: Abmas Inc. description: Posix and Samba LDAP Identity Database structuralObjectClass: organization entryUUID: af552f8e-c4a1-1027-9002-9421e01bf474 creatorsName: cn=manager,dc=abmas,dc=biz modifiersName: cn=manager,dc=abmas,dc=biz createTimestamp: 20031217055747Z modifyTimestamp: 20031217055747Z entryCSN: 2003121705:57:47Z#0x0001#0#0000 ... dn: cn=domusers,ou=Groups,dc=abmas,dc=biz objectClass: posixGroup objectClass: sambaGroupMapping gidNumber: 513 cn: domusers sambaSID: S-1-5-21-3504140859-1010554828-2431957765-513 sambaGroupType: 2 displayName: Domain Users description: Domain Users structuralObjectClass: posixGroup entryUUID: af7e98ba-c4a1-1027-900b-9421e01bf474 creatorsName: cn=manager,dc=abmas,dc=biz modifiersName: cn=manager,dc=abmas,dc=biz createTimestamp: 20031217055747Z modifyTimestamp: 20031217055747Z entryCSN: 2003121705:57:47Z#0x000a#0#0000Your LDAP database is ready for testing. You can now start the LDAP server using the system tool for your Linux operating system. For SUSE Linux, you can do this as follows:
root#rcldap startIt is now a good idea to validate that the LDAP server is running correctly. Execute the following:
root#ldapsearch -x -b "dc=abmas,dc=biz" "(ObjectClass=*)" # extended LDIF # # LDAPv3 # base <dc=abmas,dc=biz> with scope sub # filter: (ObjectClass=*) # requesting: ALL # # abmas.biz dn: dc=abmas,dc=biz objectClass: dcObject objectClass: organization dc: abmas o: Abmas Inc. description: Posix and Samba LDAP Identity Database ... # domusers, Groups, abmas.biz dn: cn=domusers,ou=Groups,dc=abmas,dc=biz objectClass: posixGroup objectClass: sambaGroupMapping gidNumber: 513 cn: domusers sambaSID: S-1-5-21-3504140859-1010554828-2431957765-513 sambaGroupType: 2 displayName: Domain Users description: Domain Users # search result search: 2 result: 0 Success # numResponses: 11 # numEntries: 10Your LDAP server is ready for creation of additional accounts.
Example 15.6. LDAP Pre-configuration Script: SMBLDAP-ldif-preconfig.sh Part A
#!/bin/bash
#
# This script prepares the ldif LDAP load file only
#

# Pattern File Name
file=init-ldif.pat

# The name of my organization
ORGNAME="My Organization"

# My Internet domain. ie: if my domain is: buckets.org, INETDOMAIN="buckets"
INETDOMAIN="my-domain"

# In the above case, md domain is: buckets.org, TLDORG="org"
TLDORG="org"

# This is the Samba Domain/Workgroup Name
DOMNAME="MYWORKGROUP"

#
# Here We Go ...
#

cat <<EOF

How do you wish to refer to your organization?

Suggestions:
	Black Tire Company, Inc.
	Cat With Hat Ltd.

How would you like your organization name to appear?

EOF

echo "Your organization name is: $ORGNAME"
echo
echo "Enter a new name or, press Enter to Continue."
echo
Example 15.7. LDAP Pre-configuration Script: SMBLDAP-ldif-preconfig.sh Part B
echo -e -n "Name [$ORGNAME]: "
	read name

if [ ! -z "$name" ]; then
	ORGNAME=${name}
fi
echo
sed "s/ORGNAME/${ORGNAME}/g" < $file > $file.tmp1

# Try to find smb.conf

if [ -e /usr/local/samba/lib/smb.conf ]; then
	CONF=/usr/local/samba/lib/smb.conf
elif [ -e /etc/samba/smb.conf ]; then
	CONF=/etc/samba/smb.conf
fi

echo "Samba Config File Location [$CONF]: "
echo
echo "Enter a new full path or press Enter to continue."
echo
echo -n "Samba Config File Location [$CONF]: "
	read name
if [ ! -z "$name" ]; then
	CONF=$name
fi
echo

# Find the name of our Domain/Workgroup
DOMNAME=`grep -i workgroup ${CONF} | sed "s/ //g" | cut -f2 -d=`
echo Domain Name: $DOMNAME
echo

sed "s/DOMNAME/${DOMNAME}/g" < $file.tmp1 > $file.tmp2

DOMSID=`net getlocalsid ${DOMNAME} | cut -f2 -d: | sed "s/ //g"`
echo Domain SID: $DOMSID

sed "s/DOMSID/${DOMSID}/g" < $file.tmp2 > $file.tmp1
Example 15.8. LDAP Pre-configuration Script: SMBLDAP-ldif-preconfig.sh Part C
cat <<EOL
The name of your Internet domain is now needed in a special format
as follows, if your domain name is mydomain.org, what we need is
the information in the form of:
	Domain ID: mydomain
	Top level: org

If your fully qualified hostname is: snoopy.bazaar.garagesale.net
where "snoopy" is the name of the machine,
Then the information needed is:
	Domain ID: garagesale
	Top Level: net

EOL
INETDOMAIN=`hostname -d | cut -f1 -d.`
echo Found the following domain name: `hostname -d`
echo "I think the bit we are looking for might be: $INETDOMAIN"
echo
echo -n "Enter the domain name or press Enter to continue: "
	read domnam
if [ ! -z $domnam ]; then
	INETDOMAIN=$domnam
fi
echo
sed "s/INETDOMAIN/${INETDOMAIN}/g" < $file.tmp1 > $file.tmp2
TLDORG=`hostname -d | sed "s/${INETDOMAIN}.//g"`
echo "The top level organization name I will use is: ${TLDORG}"
echo
echo -n "Enter the top level org name or press Enter to continue: "
	read domnam
if [ ! -z $domnam ]; then
        TLDORG=$domnam
fi
sed "s/TLDORG/${TLDORG}/g" < $file.tmp2 > $DOMNAME.ldif
rm $file.tmp*
exit 0
Example 15.9. LDIF Pattern File Used to Pre-configure LDAP Part A
dn: dc=INETDOMAIN,dc=TLDORG
objectClass: dcObject
objectClass: organization
dc: INETDOMAIN
o: ORGNAME
description: Posix and Samba LDAP Identity Database

dn: cn=Manager,dc=INETDOMAIN,dc=TLDORG
objectClass: organizationalRole
cn: Manager
description: Directory Manager

dn: ou=People,dc=INETDOMAIN,dc=TLDORG
objectClass: top
objectClass: organizationalUnit
ou: People

dn: ou=Computers,dc=INETDOMAIN,dc=TLDORG
objectClass: top
objectClass: organizationalUnit
ou: Computers

dn: ou=Groups,dc=INETDOMAIN,dc=TLDORG
objectClass: top
objectClass: organizationalUnit
ou: Groups

dn: ou=Idmap,dc=INETDOMAIN,dc=TLDORG
objectClass: top
objectClass: organizationalUnit
ou: Idmap

dn: ou=Domains,dc=INETDOMAIN,dc=TLDORG
objectClass: top
objectClass: organizationalUnit
ou: Domains

dn: sambaDomainName=DOMNAME,ou=Domains,dc=INETDOMAIN,dc=TLDORG
objectClass: sambaDomain
sambaDomainName: DOMNAME
sambaSID: DOMSID
sambaAlgorithmicRidBase: 1000
structuralObjectClass: sambaDomain
Example 15.10. LDIF Pattern File Used to Pre-configure LDAP Part B
dn: cn=domadmins,ou=Groups,dc=INETDOMAIN,dc=TLDORG
objectClass: posixGroup
objectClass: sambaGroupMapping
gidNumber: 512
cn: domadmins
sambaSID: DOMSID-512
sambaGroupType: 2
displayName: Domain Admins
description: Domain Administrators

dn: cn=domguests,ou=Groups,dc=INETDOMAIN,dc=TLDORG
objectClass: posixGroup
objectClass: sambaGroupMapping
gidNumber: 514
cn: domguests
sambaSID: DOMSID-514
sambaGroupType: 2
displayName: Domain Guests
description: Domain Guests Users

dn: cn=domusers,ou=Groups,dc=INETDOMAIN,dc=TLDORG
objectClass: posixGroup
objectClass: sambaGroupMapping
gidNumber: 513
cn: domusers
sambaSID: DOMSID-513
sambaGroupType: 2
displayName: Domain Users
description: Domain Users
The LDAP Account Manager (LAM) is an application suite that has been written in PHP. LAM can be used with any Web server that has PHP4 support. It connects to the LDAP server either using unencrypted connections or via SSL/TLS. LAM can be used to manage Posix accounts as well as SambaSAMAccounts for users, groups, and Windows machines (hosts).
LAM is available from the LAM home page and from its mirror sites. LAM has been released under the GNU GPL version 2. The current version of LAM is 0.4.9. Release of version 0.5 is expected in the third quarter of 2005.
A web server that will work with PHP4.
PHP4 (available from the PHP home page.)
OpenLDAP 2.0 or later.
A Web browser that supports CSS.
Perl.
The gettext package.
mcrypt + mhash (optional).
It is also a good idea to install SSL support.
LAM is a useful tool that provides a simple Web-based device that can be used to manage the contents of the LDAP directory to:
Display user/group/host and Domain entries.
Manage entries (Add/Delete/Edit).
Filter and sort entries.
Store and use multiple operating profiles.
Edit organizational units (OUs).
Upload accounts from a file.
Is compatible with Samba-2.2.x and Samba-3.
When correctly configured, LAM allows convenient management of UNIX (Posix) and Samba user, group, and windows domain member machine accounts.
The default password is “lam.” It is highly recommended that you use only an SSL connection to your Web server for all remote operations involving LAM. If you want secure connections, you must configure your Apache Web server to permit connections to LAM using only SSL.
Procedure 15.3. Apache Configuration Steps for LAM
Extract the LAM package by untarring it as shown here:
root#tar xzf ldap-account-manager_0.4.9.tar.gzAlternatively, install the LAM DEB for your system using the following command:
root#dpkg -i ldap-account-manager_0.4.9.all.debCopy the extracted files to the document root directory of your Web server. For example, on SUSE Linux Enterprise Server 9, copy to the
/srv/www/htdocsdirectory.Set file permissions using the following commands:
root#chown -R wwwrun:www /srv/www/htdocs/lamroot#chmod 755 /srv/www/htdocs/lam/sessroot#chmod 755 /srv/www/htdocs/lam/tmproot#chmod 755 /srv/www/htdocs/lam/configroot#chmod 755 /srv/www/htdocs/lam/lib/*plUsing your favorite editor create the following
config.cfgLAM configuration file:root#cd /srv/www/htdocs/lam/configroot#cp config.cfg_sample config.cfgroot#vi config.cfgAn example file is shown in “Example LAM Configuration File config.cfg”. This is the minimum configuration that must be completed. The LAM profile file can be created using a convenient wizard that is part of the LAM configuration suite.
Start your Web server then, using your Web browser, connect to LAM URL. Click on the the
Configuration Loginlink then click on the Configuration Wizard link to begin creation of the default profile so that LAM can connect to your LDAP server. Alternately, copy thelam.conf_samplefile to a file calledlam.confthen, using your favorite editor, change the settings to match local site needs.
An example of a working file is shown here in “LAM Profile Control File lam.conf”. This file has been stripped of comments to keep the size small. The comments and help information provided in the profile file that the wizard creates is very useful and will help many administrators to avoid pitfalls. Your configuration file obviously reflects the configuration options that are preferred at your site.
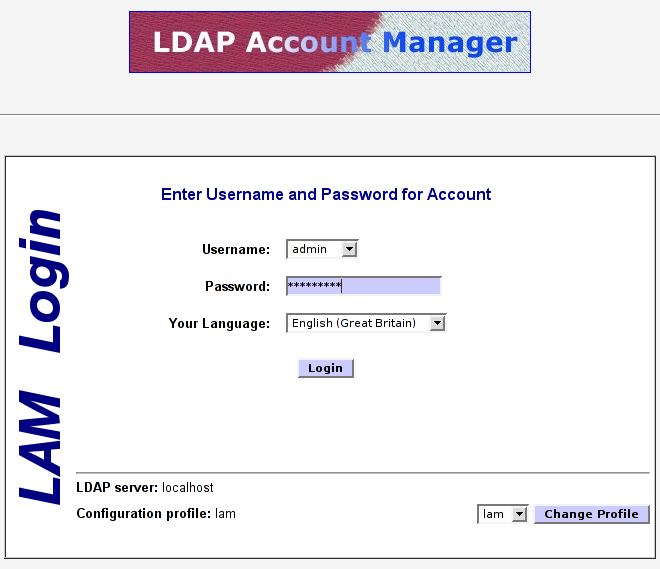
It is important that your LDAP server is running at the time that LAM is being configured. This permits you to validate correct operation. An example of the LAM login screen is provided in “The LDAP Account Manager Login Screen”.
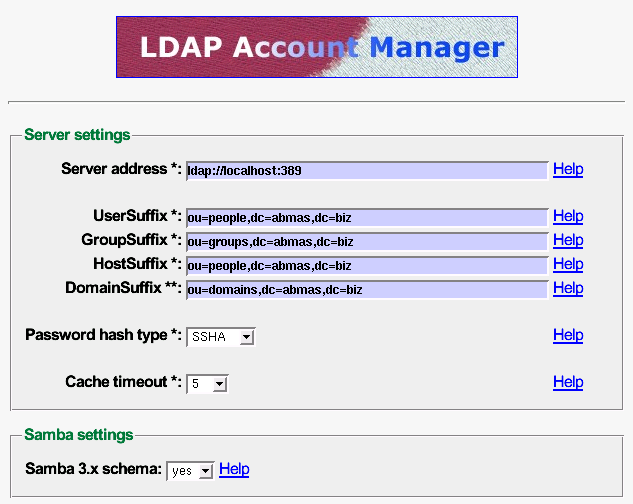
The LAM configuration editor has a number of options that must be managed correctly. An example of use of the LAM configuration editor is shown in “The LDAP Account Manager Configuration Screen”. It is important that you correctly set the minimum and maximum UID/GID values that are permitted for use at your site. The default values may not be compatible with a need to modify initial default account values for well-known Windows network users and groups. The best work-around is to temporarily set the minimum values to zero (0) to permit the initial settings to be made. Do not forget to reset these to sensible values before using LAM to add additional users and groups.
LAM has some nice, but unusual features. For example, one unexpected feature in most application screens permits the generation of a PDF file that lists configuration information. This is a well thought out facility. This option has been edited out of the following screen shots to conserve space.
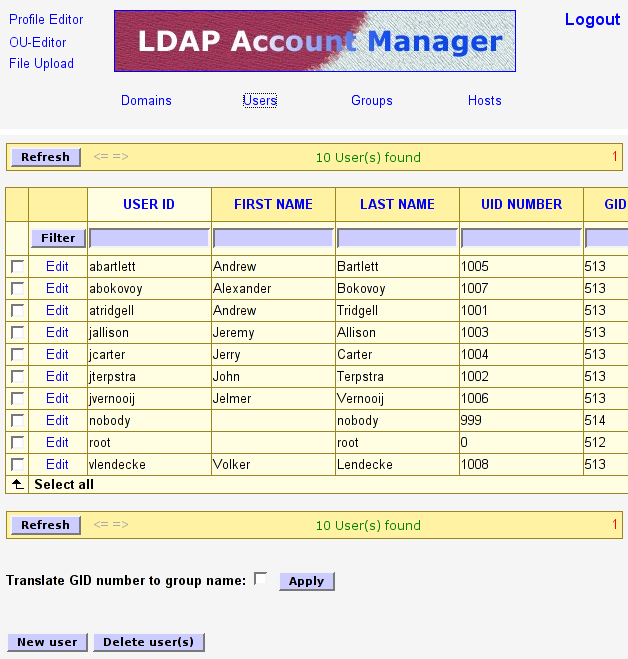
When you log onto LAM the opening screen drops you right into the user manager as shown in “The LDAP Account Manager User Edit Screen”. This is a logical action as it permits the most-needed facility to be used immediately. The editing of an existing user, as with the addition of a new user, is easy to follow and very clear in both layout and intent. It is a simple matter to edit generic settings, UNIX specific parameters, and then Samba account requirements. Each step involves clicking a button that intuitively drives you through the process. When you have finished editing simply press the button.
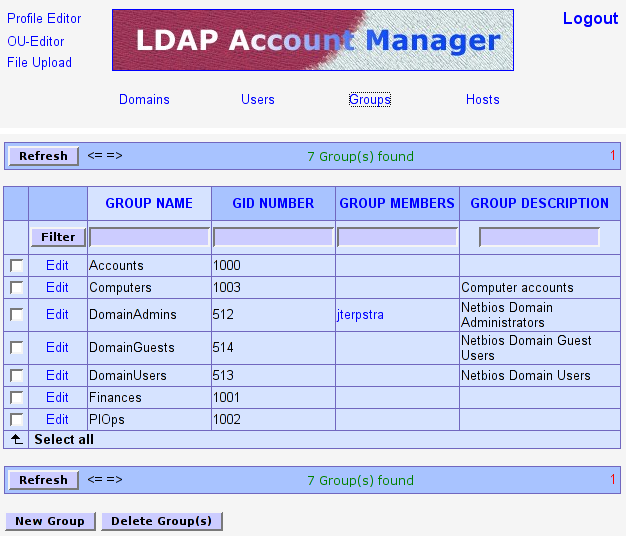
The edit screen for groups is shown in “The LDAP Account Manager Group Edit Screen”. As with the edit screen for user accounts, group accounts may be rapidly dealt with. “The LDAP Account Manager Group Membership Edit Screen” shows a sub-screen from the group editor that permits users to be assigned secondary group memberships.
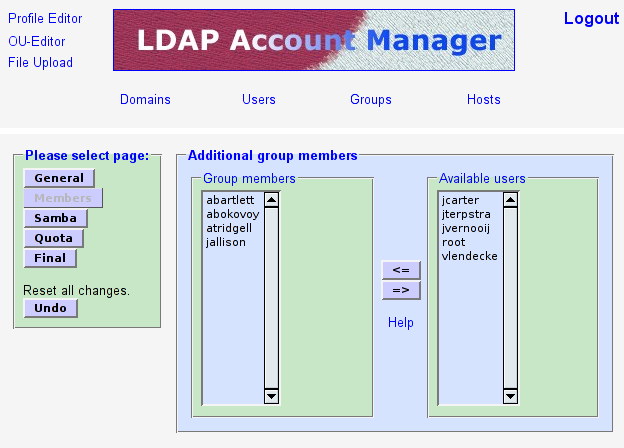
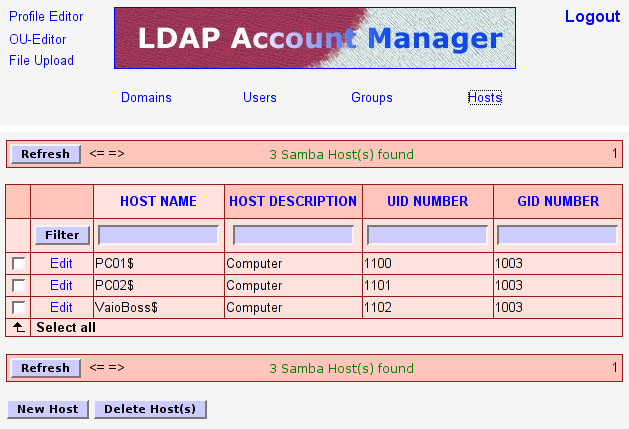
The final screen presented here is one that you should not normally need to use. Host accounts will be automatically managed using the smbldap-tools scripts. This means that the screen “The LDAP Account Manager Host Edit Screen” will, in most cases, not be used.
One aspect of LAM that may annoy some users is the way it forces certain conventions on the administrator. For example, LAM does not permit the creation of Windows user and group accounts that contain spaces even though the underlying UNIX/Linux operating system may exhibit no problems with them. Given the propensity for using upper-case characters and spaces (particularly in the default Windows account names) this may cause some annoyance. For the rest, LAM is a very useful administrative tool.
The next major release, LAM 0.5, will have fewer restrictions and support the latest Samba features (e.g., logon hours). The new plugin-based architecture also allows management of much more different account types like plain UNIX accounts. The upload can now handle groups and hosts, too. Another important point is the tree view which allows browsing and editing LDAP objects directly.
Example 15.11. Example LAM Configuration File config.cfg
# password to add/delete/rename configuration profiles
password: not24get

# default profile, without ".conf"
default: lam
Example 15.12. LAM Profile Control File lam.conf
ServerURL: ldap://massive.abmas.org:389
Admins: cn=Manager,dc=abmas,dc=biz
Passwd: not24get
usersuffix: ou=People,dc=abmas,dc=biz
groupsuffix: ou=Groups,dc=abmas,dc=biz
hostsuffix: ou=Computers,dc=abmas,dc=biz
domainsuffix: ou=Domains,dc=abmas,dc=biz
MinUID: 0
MaxUID: 65535
MinGID: 0
MaxGID: 65535
MinMachine: 20000
MaxMachine: 25000
userlistAttributes: #uid;#givenName;#sn;#uidNumber;#gidNumber
grouplistAttributes: #cn;#gidNumber;#memberUID;#description
hostlistAttributes: #cn;#description;#uidNumber;#gidNumber
maxlistentries: 30
defaultLanguage: en_GB:ISO-8859-1:English (Great Britain)
scriptPath:
scriptServer:
samba3: yes
cachetimeout: 5
pwdhash: SSHA
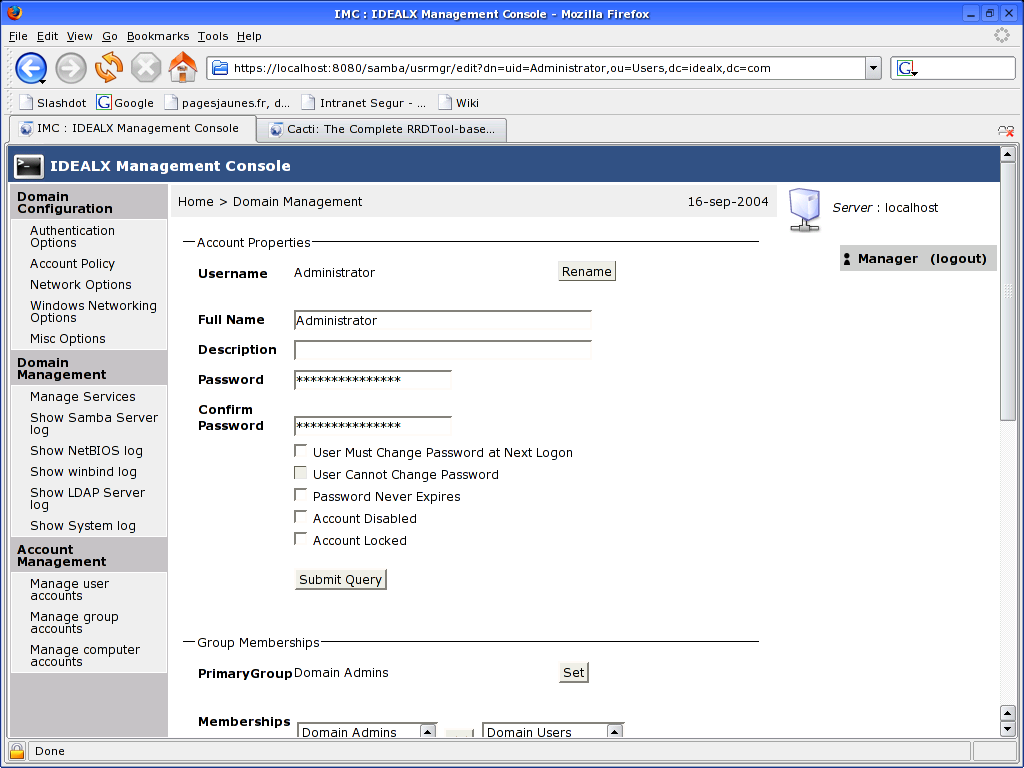
IMC (the IDEALX Mamagement Console) is a tool that can be used as the basis for a comprehensive web-based management interface for UNIX and Linux systems.
The Samba toolset is the first console developped for IMC. It offers a simple and ergonomic interface for managing a Samba domain controler. The goal is to give Linux administrators who need to manage production Samba servers an effective, intuitive and consistent management experience. An IMC screenshot of the user management tool is shown in “The IMC Samba User Account Screen”.
IMC is built on a set of Perl modules. Most modules are standard CPAN modules. Some are bundled with IMC, but will soon to be hosted on the CPAN independently, like Struts4P, a port of Struts to the Perl language.
For further information regarding IMC refer to the web site. Prebuilt RPM packages are also available.
The setting of the SUID/SGID bits on the file or directory permissions flag has particular
consequences. If the file is executable and the SUID bit is set, it executes with the privilege
of (with the UID of) the owner of the file. For example, if you are logged onto a system as
a normal user (let's say as the user bobj), and you execute a file that is owned
by the user root (uid = 0), and the file has the SUID bit set, then the file is
executed as if you had logged in as the user root and then executed the file.
The SUID bit effectively gives you (as bobj) administrative privilege for the
use of that executable file.
The setting of the SGID bit does precisely the same as the effect of the SUID bit, except that it applies the privilege to the UNIX group setting. In other words, the file executes with the force of capability of the group.
When the SUID/SGID permissions are set on a directory, all files that are created within that directory
are automatically given the ownership of the SUID user and the SGID group, as per the ownership
of the directory in which the file is created. This means that the system level create()
function executes with the SUID user and/or SGID group of the directory in which the file is
created.
If you want to obtain the SUID behavior, simply execute the following command:
root# chmod u+s file-or-directory
To set the SGID properties on a file or a directory, execute this command:
root# chmod g+s file-or-directory
And to set both SUID and SGID properties, execute the following:
root# chmod ug+s file-or-directory
Let's consider the example of a directory /data/accounts. The permissions on this
directory before setting both SUID and SGID on this directory are:
root#  ls -al /data/accounts
total 1
drwxr-xr-x   10 root     root          232 Dec 18 17:08 .
drwxr-xr-x   21 root     root          600 Dec 17 23:15 ..
drwxrwxrwx    2 bobj     Domain Users  48 Dec 18 17:08 accounts/
drwx------    2 root     root           48 Jan 26  2002 lost+found
In this example, if the user maryv creates a file, it is owned by her.
If maryv has the primary group of Accounts, the file is
owned by the group Accounts, as shown in this listing:
root#  ls -al /data/accounts/maryvfile.txt
drw-rw-r--    2 maryv    Accounts     12346 Dec 18 17:53
Now you set the SUID and SGID and check the result as follows:
root#chmod ug+s /data/accountsroot#ls -al /data/accounts total 1 drwxr-xr-x 10 root root 232 Dec 18 17:08 . drwxr-xr-x 21 root root 600 Dec 17 23:15 .. drwsrwsr-x 2 bobj Domain Users 48 Dec 18 17:08 accounts drwx------ 2 root root 48 Jan 26 2002 lost+found
If maryv creates a file in this directory after this change has been made, the
file is owned by the user bobj, and the group is set to the group
Domain Users, as shown here:
root#chmod ug+s /data/accountsroot#ls -al /data/accounts/maryvfile.txt total 1 drw-rw-r-- 2 bobj Domain Users 12346 Dec 18 18:11 maryvfile.txt
The integrity of shared data is often viewed as a particularly emotional issue, especially where there are concurrent problems with multiuser data access. Contrary to the assertions of some who have experienced problems in either area, the cause has nothing to do with the phases of the moons of Jupiter.
The solution to concurrent multiuser data access problems must consider three separate areas from which the problem may stem:
application-level locking controls
client-side locking controls
server-side locking controls
Many database applications use some form of application-level access control. An example of one well-known application that uses application-level locking is Microsoft Access. Detailed guidance is provided here because this is the most common application for which problems have been reported.
Common applications that are affected by client- and server-side locking controls include MS Excel and Act!. Important locking guidance is provided here.
The best advice that can be given is to carefully read the Microsoft knowledgebase articles that cover this area. Examples of relevant documents include:
http://support.microsoft.com/default.aspx?scid=kb;en-us;208778
http://support.microsoft.com/default.aspx?scid=kb;en-us;299373
Make sure that your MS Access database file is configured for multiuser access (not set for
exclusive open). Open MS Access on each client workstation, then set the following: ++. Set network path to Default database folder: \\server\share\folder.
You can configure MS Access file sharing behavior as follows: click . Set:
Default open mode: Shared
Default Record Locking: Edited Record
Open databases using record_level locking
You must now commit the changes so that they will take effect. To do so, click . At this point, you should exit MS Access, restart it, and then validate that these settings have not changed.
Where the server sharing the ACT! database(s) is running Samba,or Windows NT, 200x, or XP, you must disable opportunistic locking on the server and all workstations. Failure to do so results in data corruption. This information is available from the Act! Web site knowledgebase articles 1998223162925 as well as from article 200110485036.
These documents clearly state that opportunistic locking must be disabled on both
the server (Samba in the case we are interested in here), as well as on every workstation
from which the centrally shared Act! database will be accessed. Act! provides
a tool called Act!Diag that may be used to disable all workstation
registry settings that may otherwise interfere with the operation of Act!
Registered Act! users may download this utility from the Act! Web
site.
Third-party Windows applications may not be compatible with the use of opportunistic file and record locking. For applications that are known not to be compatible,[14] oplock support may need to be disabled both on the Samba server and on the Windows workstations.
Oplocks enable a Windows client to cache parts of a file that are being edited. Another windows client may then request to open the file with the ability to write to it. The server will then ask the original workstation that had the file open with a write lock to release its lock. Before doing so, that workstation must flush the file from cache memory to the disk or network drive.
Disabling of Oplocks usage may require server and client changes. Oplocks may be disabled by file, by file pattern, on the share, or on the Samba server.
The following are examples showing how Oplock support may be managed using
Samba smb.conf file settings:
By file:        veto oplock files = myfile.mdb

By Pattern:     veto oplock files = /*.mdb/

On the Share:   oplocks = No
                level2 oplocks = No

On the server:
(in [global])   oplocks = No
                level2 oplocks = No
The following registry entries on Microsoft Windows XP Professional, 2000 Professional, and Windows NT4 workstation clients must be configured as shown here:
REGEDIT4

[HKEY_LOCAL_MACHINE\SYSTEM\CurrentControlSet\
            Services\LanmanServer\Parameters]
      "EnableOplocks"=dword:00000000

[HKEY_LOCAL_MACHINE\SYSTEM\CurrentControlSet\
            Services\LanmanWorkstation\Parameters]
      "UseOpportunisticLocking"=dword:00000000
Comprehensive coverage of file and record-locking controls is provided in TOSHARG2, Chapter 13. The information in that chapter was obtained from a wide variety of sources.